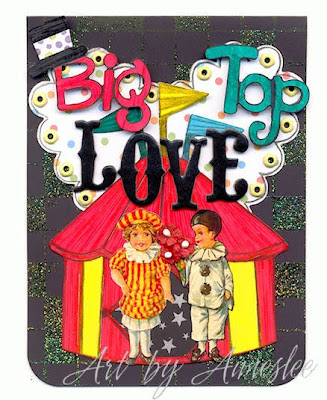
I know I was supposed to post Friday and show you the circus-themed art I'd made, but I didn't finish up until last night and then like a worn-out 5-yr-old promptly fell asleep without remembering my resposibilities. And the 2 margerita rocks-sugar rims that Hubs made me didn't help me stay awake, lol. But I did feel great! hehe
Then, this morning, still forgetting my promised post, I set about coloring and texturing this sweet little lamb and duck digital stamp from WinkWinkInk (see sidebar for link). I outlined the lamb in a light grey zig marker, then used my yellow and orange copics on the duck. I added pink Prisma pencil highlights to the lamb and then dotted his fur with Frosted Lace Stickles. I did the dotting twice, letting the first dotting dry first and seeing where there were bald spots for the second dotting. This gives it just enough dimension to scan in a wool-like look. In real life, my lamb's coat is quite glittery and shiny, but on a scan (which you are seeing), none of the glitter shows and instead gives off the textural monochrome look I want.
This can be done with any digital stamp or coloring book image, but remember to scan in before using. That way you have an image to print out again for future use.
I also played a bit with my Paint Shop Pro, framing this image and creating an "Art by Aimeslee" watermark, which I feel that I need to start adding to my art that I show online. Only problem is, it creates one more image of every piece that I have to save, but I guess that's the breaks.
Anyhoo, wanted to share that and convey my best wishes to you for a blessed Easter weekend. Now, on to the circus art...
I love this anniversary card! I began by stamping a background with yellow pigment ink using my Crossword Scrapblock stamp from Cornish Heritage Farms (see sidebar for link) and then heat embossing the entire thing with Ranger Holographic embossing powder. It ends up very sparkly and looking green in some places, gold in others. It was the only background stamp I had with checks, which is what I wanted. And it's a card for my stamping group so I wanted to have some stamping on it somewhere.
Then, I took white index cardstock and diecut the Sizzix Big Top lettering and the tent. I took the polkadot paper and diecut the Sizzix scalloped heart. I punched holes in each scallop and set the eyelets, and then outlined the scallops with a black Prisma pencil. I also outlined the tent after coloring it and the Big Top lettering with my zig markers. I outlined the lettering with my black Copic for a darker effect. I forget who makes the "Love" chipboard letters, but I used them straight out of the storage drawer. I threaded some tiny Doodlebug posies through the little clown guy's hand and all that was left was to arrange it all and adhere with a ton of foam tape. The guy and gal are very old collage scrap images from Inka's (now Scrollswork - see sidebar for link).
Here's the ATC that began the circus thing for me. I get the Dover email every Friday and have quite a large folder of saved images from it. I printed out the background image in black and white, and colored it with my Prisma pencils. Then, I cut out the little elephant from my Grace Drayton collection of paper doll images on stiff cardstock. He's called The Laughing Elephant and I think he's so cute in his little suit, don't you? The ball was cut out of a Melissa Frances vintage label that I had. I edged the little guy with a blue Copic which bled a bit but gave him a vintage definition I think looks good. I edged the ball with a black Copic and added some Chatterbox chipboard corners.
I have one more circus-themed idea in the works that is nowhere near complete, and that will have to wait until another time. But these two art pieces are good examples of the way I am playing now -- just letting my imagination lead my fingers. Okay, I'll never completely just let go and let loose completely, but hey, even a little free can be fun.
I'll leave you with a sketch card I made on the fly after all this, reminiscent still of a circus theme. While getting the ball for my laughing elephant above, I spied some vintage Melissa Frances toy chipboard images that I thought would work great on a birthday card. I remembered a card sketch from my stamping group that was great for using inchies, so I adapted it. You can see how I added and embellished by comparing my finished card with the sketch it's based on:


I wanted to add some stamping to this, so I added a mat for the images. I used a Starving Artistamp background stamp that looks like screen door netting, but I had to limit the size of the mat to the stamp because I'm not expert enough in stamping to seamlessly continue a rubber stamp pattern. So, I added the sheer ribbon to the top and bottom of the red mat. I also added some Paper Salon Fancy Flourishes corners that I stamped onto some patterned paper and cut out. I also punched all paper corners with my new Fiskars 4-corner punch.
Now, true, I used a sketch, but only as a starting point for arranging my focus elements. (And, also true, I want to continue creating sketch card samples for my group. So, when the sketch fits...).


1 comment:
MY GOODNESS but you have been busy!!! Absolutely awesome creations and very inspirational! Thanks for all the little tips!!
Post a Comment