Pages

Showing posts with label tips. Show all posts

Saturday, April 3, 2010

Easter blessings


I know I was supposed to post Friday and show you the circus-themed art I'd made, but I didn't finish up until last night and then like a worn-out 5-yr-old promptly fell asleep without remembering my resposibilities. And the 2 margerita rocks-sugar rims that Hubs made me didn't help me stay awake, lol. But I did feel great! hehe

Then, this morning, still forgetting my promised post, I set about coloring and texturing this sweet little lamb and duck digital stamp from WinkWinkInk (see sidebar for link). I outlined the lamb in a light grey zig marker, then used my yellow and orange copics on the duck. I added pink Prisma pencil highlights to the lamb and then dotted his fur with Frosted Lace Stickles. I did the dotting twice, letting the first dotting dry first and seeing where there were bald spots for the second dotting. This gives it just enough dimension to scan in a wool-like look. In real life, my lamb's coat is quite glittery and shiny, but on a scan (which you are seeing), none of the glitter shows and instead gives off the textural monochrome look I want.

This can be done with any digital stamp or coloring book image, but remember to scan in before using. That way you have an image to print out again for future use.

I also played a bit with my Paint Shop Pro, framing this image and creating an "Art by Aimeslee" watermark, which I feel that I need to start adding to my art that I show online. Only problem is, it creates one more image of every piece that I have to save, but I guess that's the breaks.

Anyhoo, wanted to share that and convey my best wishes to you for a blessed Easter weekend. Now, on to the circus art...

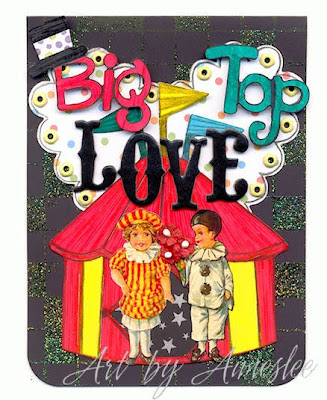
I love this anniversary card! I began by stamping a background with yellow pigment ink using my Crossword Scrapblock stamp from Cornish Heritage Farms (see sidebar for link) and then heat embossing the entire thing with Ranger Holographic embossing powder. It ends up very sparkly and looking green in some places, gold in others. It was the only background stamp I had with checks, which is what I wanted. And it's a card for my stamping group so I wanted to have some stamping on it somewhere.

Then, I took white index cardstock and diecut the Sizzix Big Top lettering and the tent. I took the polkadot paper and diecut the Sizzix scalloped heart. I punched holes in each scallop and set the eyelets, and then outlined the scallops with a black Prisma pencil. I also outlined the tent after coloring it and the Big Top lettering with my zig markers. I outlined the lettering with my black Copic for a darker effect. I forget who makes the "Love" chipboard letters, but I used them straight out of the storage drawer. I threaded some tiny Doodlebug posies through the little clown guy's hand and all that was left was to arrange it all and adhere with a ton of foam tape. The guy and gal are very old collage scrap images from Inka's (now Scrollswork - see sidebar for link).


Here's the ATC that began the circus thing for me. I get the Dover email every Friday and have quite a large folder of saved images from it. I printed out the background image in black and white, and colored it with my Prisma pencils. Then, I cut out the little elephant from my Grace Drayton collection of paper doll images on stiff cardstock. He's called The Laughing Elephant and I think he's so cute in his little suit, don't you? The ball was cut out of a Melissa Frances vintage label that I had. I edged the little guy with a blue Copic which bled a bit but gave him a vintage definition I think looks good. I edged the ball with a black Copic and added some Chatterbox chipboard corners.

I have one more circus-themed idea in the works that is nowhere near complete, and that will have to wait until another time. But these two art pieces are good examples of the way I am playing now -- just letting my imagination lead my fingers. Okay, I'll never completely just let go and let loose completely, but hey, even a little free can be fun.

I'll leave you with a sketch card I made on the fly after all this, reminiscent still of a circus theme. While getting the ball for my laughing elephant above, I spied some vintage Melissa Frances toy chipboard images that I thought would work great on a birthday card. I remembered a card sketch from my stamping group that was great for using inchies, so I adapted it.  You can see how I added and embellished by comparing my finished card with the sketch it's based on:
I wanted to add some stamping to this, so I added a mat for the images. I used a Starving Artistamp background stamp that looks like screen door netting, but I had to limit the size of the mat to the stamp because I'm not expert enough in stamping to seamlessly continue a rubber stamp pattern. So, I added the sheer ribbon to the top and bottom of the red mat. I also added some Paper Salon Fancy Flourishes corners that I stamped onto some patterned paper and cut out. I also punched all paper corners with my new Fiskars 4-corner punch.

Now, true, I used a sketch, but only as a starting point for arranging my focus elements. (And, also true, I want to continue creating sketch card samples for my group. So, when the sketch fits...).

Wednesday, March 17, 2010

Pop-Tart

Just popping in to show this recent anniversary card creation --
This card began with two things: a clear vellum sentiment sticker and this sketch from over at Paper Craft Planet:
Then, I finally purchased some rainbow ink pads (one Kaleidoscope and 4 Ranger Big n Juicy pads). So, I'm trying to think of an integrated way to incorporate that sentiment sticker...without it looking like a sticker. And then it occurs to me to brayer some rainbow ink over the stamped gate and then stick the sticker down over that. So, that's what I did. Cool, huh?

I've had that stamp for ages and long ago forgot who made it, but I do know that the dancing border is a Dee Gruenig Posh stamp called Estruscan Joy. I also rainbow-brayered the stamped border. And I used my brick wall background stamp by I Brake for Stamps to stamp a little bit of the piece behind the sticker focal image.

I'm usually not so dimensional with mail art, nor very mixed media minded when creating greeting cards, but the Muse moved me to gather up embroidery thread, a K&Co. chipboard heart, a MM blossom and silver lock and key charms, and make a little embellie.

I inked both the blossom and the heart beforehand, and I used my CropaDile to punch holes for attaching the charms. It turned out kinda weird but kinda cool, so no harm done. Best of all, I bashed a little stash.

I have to say I love brayering ink. I've never done it before because I didn't want to have to clean up the brayer, but then somewhere I saw someone open the top of her baby-wipe container and roll the ink off onto the top of the wipe stack. Doh! Why didn't I think of that? I am envisioning several lab experiments with my new tools. Happy Happy Joy Joy! winkwink

Saturday, September 26, 2009

Bookmark Tutorial


Here is a classy and easy way to mark your place in that hot book you are reading. I made a couple of these bookmarks today and decided to snap a few pics during the process for you and do a little tutorial. First, you need to get this:


Next, turn the paper over and:


Then:


Now, do this:


Then:


Next:


Finally:


Here is the other bookmark I made, for my homework in my Taking Flight class:


I used rub-ons from Marah Johnson's Travel Designs and Love Struck booklets (Creative Imaginations).

Monday, February 23, 2009

let's play catch-up

Okay, I realized this morning that I have got so so many odds n ends stored up that I have been meaning to blog.

Let me start by throwing this cute idea out: usually Photojojo makes me do the eyeroll and I don't pay much attention to the weekly emails I get from them. However, their recent idea for displaying photos on the cheap n unique did kinda tug at my likestrings. I think it makes for a cool-looking display...


{Click on photo if you want to enlarge it.}

I'm thinking, get out the glue, red liner tape or glue gun, and add some lace, beaded or pom-pom trim, whatever your preference or inspiration, to the neck of the jar and then also to the bottom (which is really the top since the jar sits upside down). In other words, cover up the glass that is not where the photo is.

I could totally see a grouping of these, maybe all sitting on a tray to keep it easy to move. Tall, short, fat, skinny -- glass jars come in all kinds of sizes. Take it from a pack rat! winkwink

Also, I would save the lids and screw them back on (after decorating it, of course) as an additional way to keep the dust outa the jars.

Dang dust. Hate being allergic to it. I haveta wet-wipe dust to avoid it flaring up my allergies, so screwing the jar lid on would be a must for dust in my house.

Next up, my mentioning of an electric eraser had a few interested replies, so I thought I'd follow up on that.

While Missy lived in a dorm off at college, her room sat idle yet semi-preserved, a storeroom to all her things that she couldn't or didn't take with her. Once she got her apartment, this all changed. I've talked to her 3 times now about coming to get what she wants, so that I can deal with the rest and clean out the room. The plan is to make it my main craft room now.

She has voiced absolutely no interest in keeping anything she left behind, so I've been slowly wading through it all and trashing what I couldn't otherwise rationalize keeping. There's a lot of *stuff* in her room (packrattery is genetic, apparently) and it's a double-edged sword for me. On one hand, it's all dusty so this always presents a potential threat to me, but I also find some interesting things I want to keep (some of it stuff she took from me and never returned, aka "Oh, that's where that went to" and some of it stuff she's discarded but I can use as hand-me-downs).

I usually try to make a bit of microscopic progress in that room on a daily basis. When I was in there the other day, guess what I found in her desk drawer?

{Click on photo if you want to enlarge it.}
Hehe, yep, an electric eraser! So, I tried it out. Bleh. It was cool for about the first 5 minutes. Then, not so cool. The eraser nib wears down quickly and then it takes the skills of a jeweler to unscrew and disassemble the thing to replace the nib. Plus, it takes longer to use it than it does to just erase with elbow grease, even using just the nib by itself! {Insert huge eyeroll}. I realize this is a cheap model, but since I am not buying a professional corded model (which can be over a $100 bucks), I'm no longer interested in an electric eraser. In fact, I ended up throwing it out.

Talking about finding stuff in Missy's room, I came upon a couple of really cool-looking journals that I'm keeping:


{Click on photo if you want to enlarge it.}
Pretty, huh? Now, Missy has journaled her entire life, but she rarely fills a journal up, unless it's a cheap composition book which she completely fills. Usually, there are only a few pages journaled in the nicer books. Don't ask me why, probably the feel of them didn't agree with her. So, I was flipping through the nice small leather one on top to see if there was any writing, and look what I found on one page, from 2007:


{Click on photo if you want to enlarge it.}
This totally makes me LOL and one day I will scrapbook it. Gotta love the photo cut-outs and her label "artistic depiction", huh? If you are wondering if finding this upsets me, good Lord, no. I'm thinking it's completely healthy and pretty darn natural. What daughter has never felt like this toward her mother? And if this is the worst I find, I'm like, extremely lucky. Frankly, my Mommy pride is reveling in her creativity and levity.

I also realize that she might either be ridiculing me with the "artistic depiction", or she could be unconsciously modelling me. I'll have to ask her, and she will tell me. winkwink

Moving right along, I've mentioned before that I'm darn stubborn about making a calendar this year out of the calendar I bought to make last year. Just wanted to show that I am making progress on this. Here's a snap of the Karen Foster calendar paper I glued onto the monthly bases last month:


{Click on photo if you want to enlarge it.}
I used wet PVC glue so they needed to dry. I hooked them onto my dresser drawer pulls using some old shower curtain rings I've packratted. The plan is to do a collage on each month that:

1)uses only my scraps and odds n ends, and
2)represents the month's historic activities or events, and
3)is done quickly and without thinking much

Here's January's collage:

{Click on photo if you want to enlarge it.}
I drew some champagne glasses, a bottle and some little doodlings freehand, then I applied some dimensional glaze over some of it to highlight it. Trying to use up this stuff I'd bought called A Fine Line by Adhesive Tech. It has a bit of a leak in the collar of the tube, so I doubt I'd buy any more, but it does as good a job at dimensioning as Ranger Glossy Accents. A thin coat of it must dry at least 24 hrs, but is rock hard once it dries. Here's a couple of close-ups:


{Click on photo if you want to enlarge it.}
Until next time,

Thursday, January 29, 2009

recycling to reuse...


How do you store your colored pencils and related supplies like erasers, blenders? Right now, I'm liking mine in this, scarfed before our old dishwasher was hauled away last year. I keep my watercolor pencils separate from these plain janes -- different techniques and process, so why mix them? Anyway, my tip for the day, in case you have one of these just laying around, lol. Nah, probably not...winkwink.

Journalling Update...

Lately, I've been in some kind of linear art progression borne from my being so anal, I fear. I get going on prepping pages, in my present case it is painting gesso on journal pages in every journal that needs it, and I cannot stop. Well, I can but I don't want to. I get the best feeling when I'm gessoing -- I feel secure, safe, peaceful -- much like the feeling I'd get when I colored as a kid. It's also mindless and that feels good, too.

At any rate, when I do get time to play, all of this gessoing prep gets in the way of actually creating something, because I don't have access to a journal. The journal I need is either underneath a weight getting pages flattened or laying open getting pages dried.

The answer, of course, is to have a journal for right now that is solely for creating without requiring a prepped page. That means gluebooking. So, problem solved, right? Well, you know dense old me, I have to get to the answer in my roundabout way. I went to my storage box that holds blank journals and looked around.


I "inherited" this 2006 student planner from Missy. She wrote in only about 2 dozen pages of it, so it is mostly blank. I love the way this book feels in my hands, and I like it that the wire binding is small in circumference. It has an attached vinyl zip-pocket on the front that I can keep or cut off. I'm keeping it on for now.


The back chipboard on this one is very thick and strong with a nice glossy finish.


The pages feel stronger and thicker than copy paper. I'm guessing at the very least they are 38# thickness. So, I pull out the journal and gesso a two-page spread. I immediately notice that it takes the gesso well and stays pretty flat. Score!

However, I am still in the same boat, just with one more journal in the mix.


So, I go back to my box and notice this 2006 hardbound planner. I have a few of these. I was ordering them through American Express. I like how this one feels in my hands too.


There are page spreads in the front and back that are gorgeously patterned.


And every month the month view has large photos of scenery or people doing things.


So, I gesso up a spread in this book. The pages do well, almost as well as the first planner. Still, same boat.


Finally my dense brain snaps and I pull out of the box another composition book. This one has SpongeBob SquarePants on the cover. That's the one. I can call it SpongeBabe GlueBook. winkwink


Finally, remember how I pasted on the strips from a mail-order catalog to pages in my *almost daily* journal? Well, this is a photo taken of it after the next step. I brushed gesso onto the last page spread of the strips. Doesn't it look cool? When I was brushing it on, it laid down fine, but if I back-brushed across the same spot, the gesso glopped up, literally changed form. Silly me just left it that way to see how it would look after drying. I like the way it looks. I'll have fun inking and glazing over this, and so far the pages are still sturdy and intact.

Until next time,

Wednesday, January 21, 2009

i'm finally a struggling artist!

No, not like you think.

I'm struggling to keep from bashing my head against the wall, in search of a good way to prep thin pages in books and journals to accept wet media.

When I joined the Composition Book Art Journal group, I read the group files, I googled, I even read some of the books I have in my own library. By far, the most frequent answer is to use good paper (as in watercolor 140# cold press or thick handmade papers).

Well, that doesn't help me one bit, as I am pretty sure if I wrote the composition book people and told them they need to use that kind of paper, they would be laughing so hard they couldn't reply.

Ya know?

Anyhoo, one of the suggests I read was to glue two pages together to increase the strength. Okay, did that. Used a glue stick and it didn't really make them stick together all that well. Tried again. Used Yes! paste and that worked good as far as sticking, except the page was really buckled badly. So, then I added some gesso to both sides. Still buckled. Stronger, but buckled.

Note to file: do not glue 2 pages together anymore. It may work for someone else, but not for me.

Then, I ran across someone on Flickr who said she preps her pages like artist Kelly Kilmer taught her in a workshop, and she couldn't give all the details, but it involves collaging torn paper strips onto the page and then painting or gessoing on top of that.

Well, sweet! So, I thought, could this help salvage my buckled pages? I tore a bunch of strips from a mail order catalog (thin paper, kind of glossy, like magazine paper) and then basically wallpapered them on. Had a great tactile time, too. I used my Yes! paste and my fingers, because it was just easier that way (and I do get some kind of perverse enjoyment out of having my fingers right in the smooshy stuff).

Seriously, I put a little hot water in a glass custard cup, and then every time before I would spread the paste with my fingers onto the paper strips, I'd just touch my finger pads onto the surface of the water to wet them a teeny bit. This really helped me be able to smoosh the paste onto the entire paper strip, front and back. And since the paper I was using was somewhat glossy, it accepted the little amount of water very well.

Yes, I know I could also use gel medium and I have before and will again, but I have this big old container of Yes! paste sitting around slowly getting hard. You know old Kmarty me! Waste not want not!

So here's what it looked like at that point:

{Click on photo to see it larger}

To recap, this composition book page spread is pasted paper collage on top of a thin coat of gesso on top of 2 lined notebook pages pasted together. Here's another photo angle of the raw page up to this point:


{Click on photo to see it larger}

Now I let it *cure*, after first zapping it a bit with my heat gun. I left the book open to that spread, let it *be* for hours, then closed it up with wax paper between the spread and put heavy stuff on the book (to straighten the pages). Then, repeated the whole thing....for a couple of days.

And let me tell you, those pages are strong! You know the old joke about your jeans being so dirty they can stand up all by themselves? That kind of strong. So, of course, I'm loving that!

Anyway, what to do with magazine ad covered pages now? I can totally see gessoing over it or painting. But because I was going to pretty much cover most of it with my journal entry for this page spread, I just sponged on some inks which gave it a nice yellow-green hue. Here is the finished page:


{Click on photo to see it larger}

I am still experimenting. Stay tuned....until next time.