Hello, there! Thanks for dropping by and I hope your week is already a good one.
A while back, I know I mentioned having had to re-do the covers of my Puns & Roses Glue Book that has a colorful word play theme. You can see the pages I've done in it HERE. I finally took the time this past week to make and attach the cover plate, give it its final sealer coats and edit the many photos I took of the process, so it's time to share. I will give only a brief summary of my process, as I'm sure you don't want to see 50 photos hahaha.
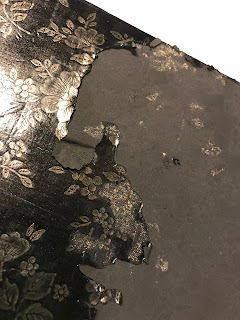
The photo above on left is what my glue book looked like originally, a discarded lined blank diary with a stitched binding that had a soft plastic-y embossed cover.
Eventually a few areas began peeling off, which I didn't mind except that it began to be messy and I soon lost my patience. So I first sealed it with Royal Coat Decoupage Medium and for a while that worked.
When it began to peel and mess again, it became worse. So I had to finish peeling it all off and re-do both the front and back, and the spine.
After viewing some YouTube videos and reading some online project tutes (none of which really addressed my specific challenges), I decided to recover with tissue paper that I was recycling from previously received gift bags. (I save everything, lol). I chose a French print tissue for the bottom layer, followed by a pink tissue and then a roses pattern on the pink for the spine and the front label. This was the first time I'd ever done anything like this, so my process was quite organic, with me just trying to logic out next what I should do.
Since I could not get 100% of the messy flaky plastic-y stuff off, I first wrapped the text block in wax paper taping it securely and then I gessoed the entire cover first. I am so glad I did because it made the surface more even and blocked the black color of the book boards.
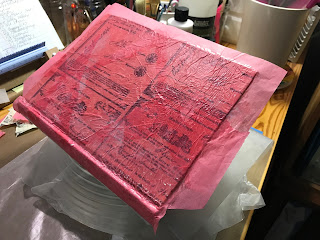
Here's the first French text layer of tissue paper. This paper was thicker than normal tissue and was very easy to decoupage on in one piece, using matte medium. I let it dry thoroughly, over night.
Then, the more transparent pink tissue, which tore easily so instead of fighting it, I tore it into triangular pieces and layered it on. This gave it an interesting texture that I liked.
I used my yellow paint pyramids to help it all air dry at every step. (The BB's are there if I need a weight.) I didn't get a pic of when I glued the strip of roses tissue to the spine, but I basically cut a strip sized to wrap the spine and glued it on.
And that's where it sat until this week, when I took some card stock from a James Avery junk mail catalog cover and die cut this Spellbinders frame and QuicKutz alpha fonts from it.
I covered the frame mat in the pink and roses tissues, and muted the pink a bit with beige and pink Versamagic. I used black to grunge it up some.
The blacks of the recycled card stocks didn't match but oh well. I decided that some black satin ribbon to edge the roses tissue on the spine would help it look more finished.
The inside is not so pretty yet, as I haven't really decided if I want to tissue it or adhere some heavier paper, add a pocket, or what.
So, the inside covers can stay this way for a while, or until the pink tissue needs to be covered.
I do think the ribbon was a nice touch.
I am ecstatic over how this project turned out. My glue book pages inside are saved and remain non-traumatized by the recover, and that was my main objective.
Plus, I wanted it to look nice and I think it looks much better than before.
I learned a simple way to recover or cover a book or journal with tissue paper. The glue book itself is a recycle since it was originally my daughter's diary she discarded. I was able to use recycled tissue papers and junk mail ad card stock (James Avery magazine covers are not too shabby!)
And I love how the spine looks on the shelf, so easily recognizable...no label needed!
Thank you for suffering through all of these photos! I am participating in the following challenges with this project:
Have an artylicious week!


No comments:
Post a Comment